Donater

Donater

Vue.Js
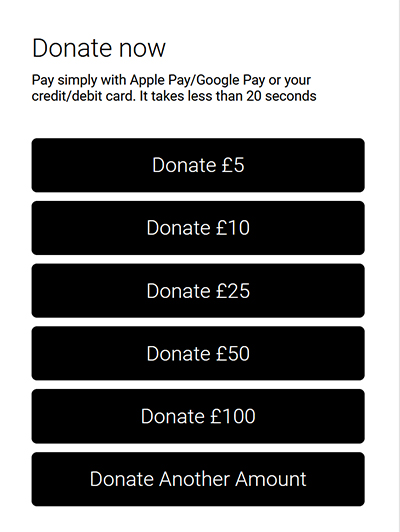
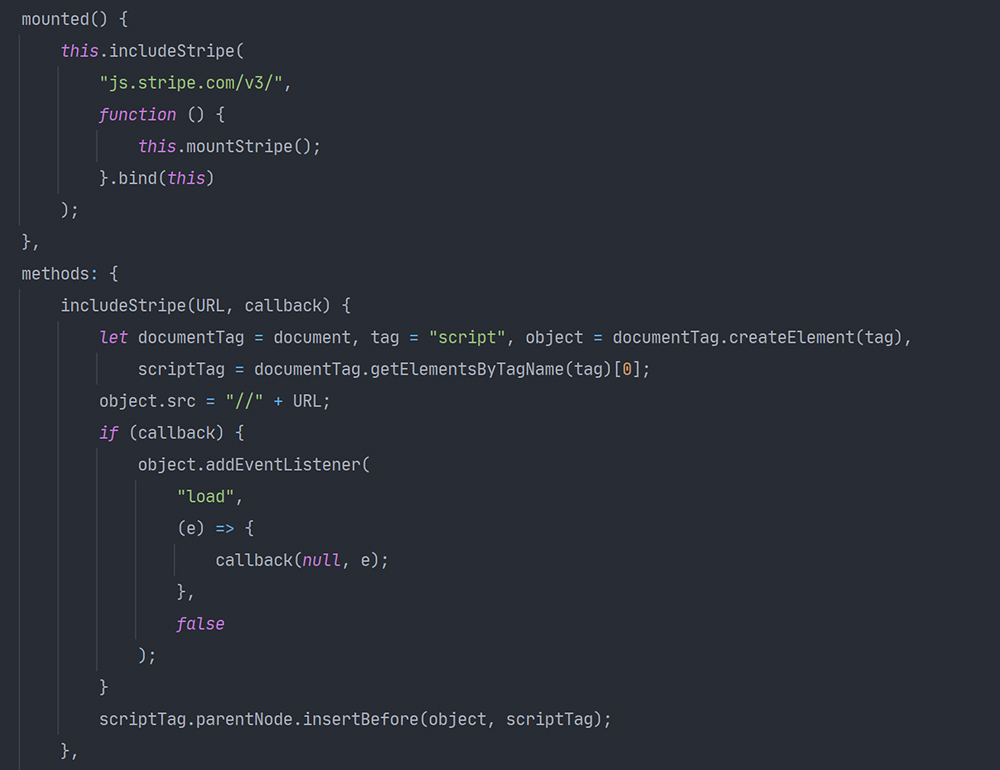
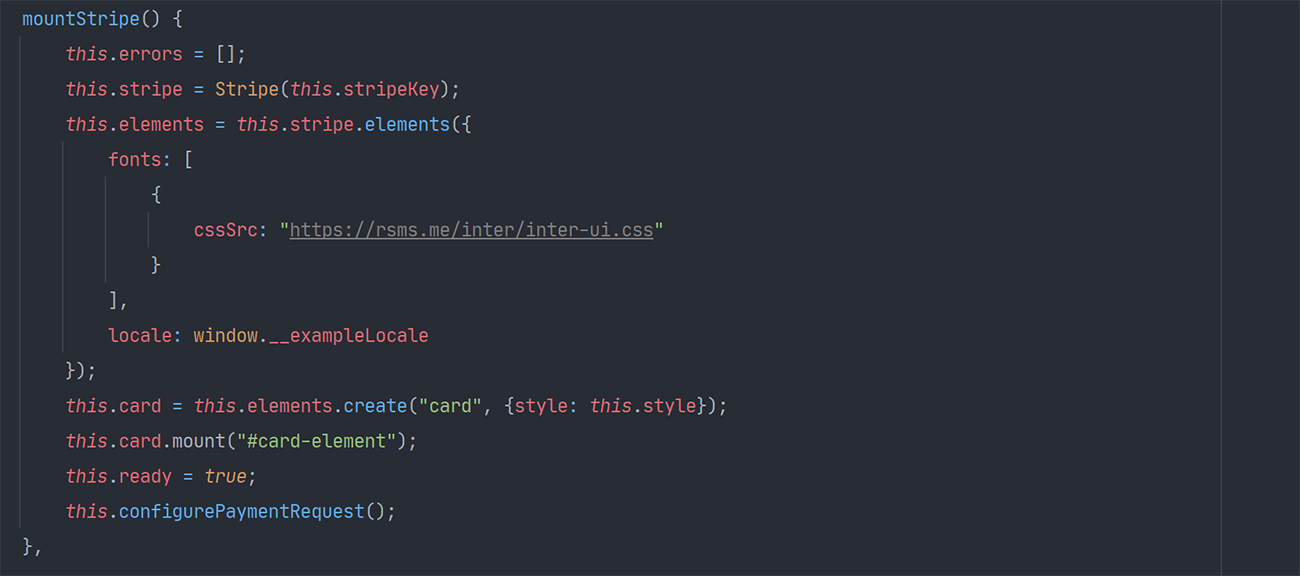
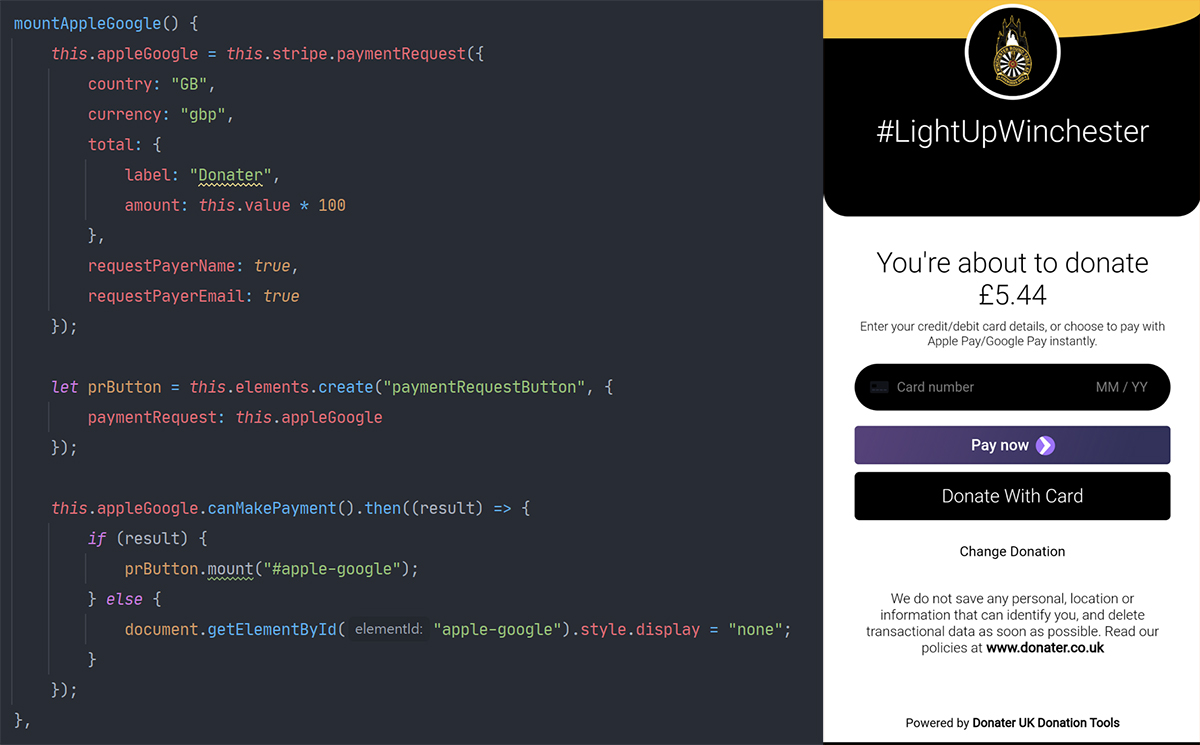
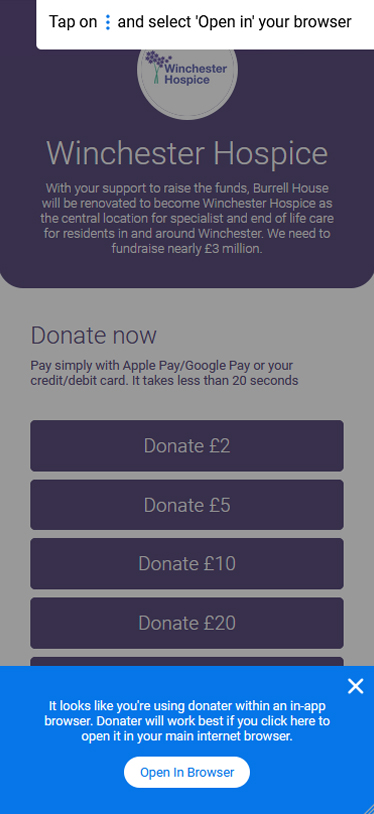
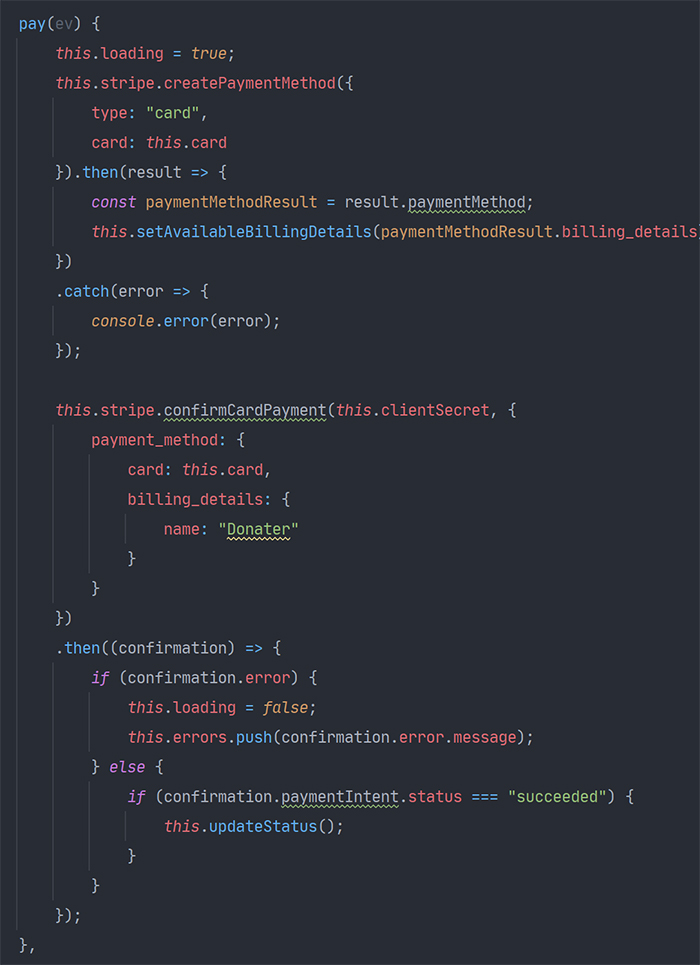
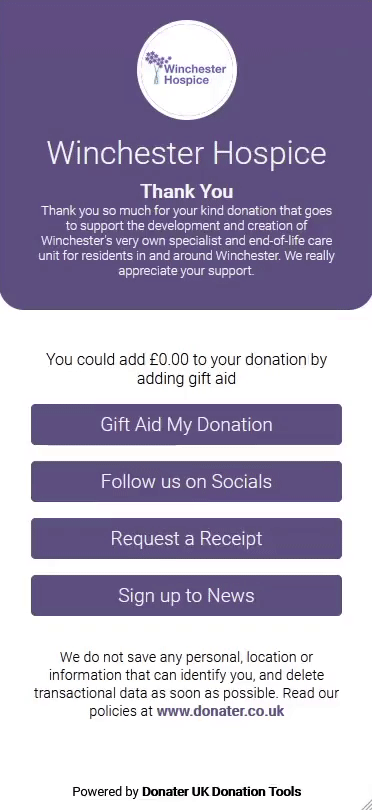
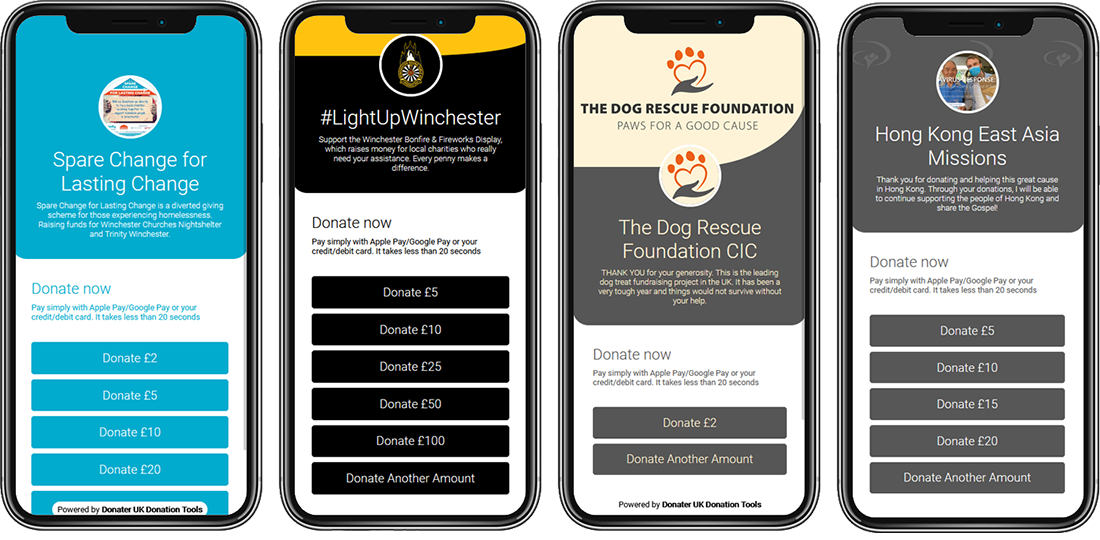
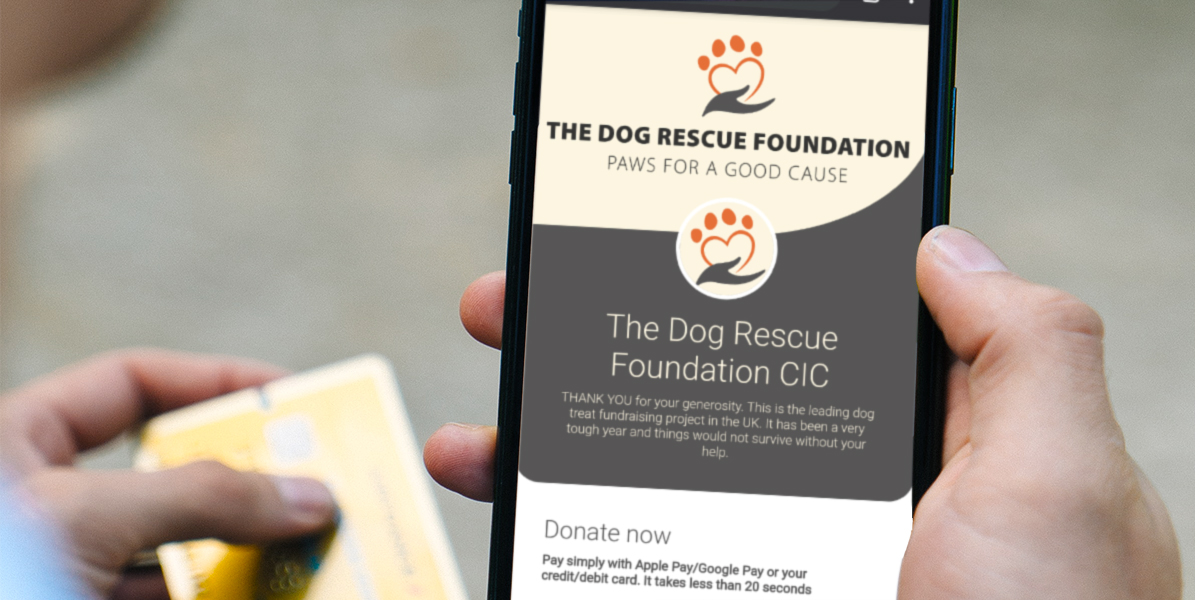
Sprechen were creating a donation app to utilise QR codes and people's phones to increase donations for charities. This app would rival sites like just giving to make a faster user experience and incoperate one tap payments through apple and google pay. The app would also be customisable for a charities brand so that they could inject their identity into the process.

Using QR Codes

Using QR Codes

The main premise behind Donater is giving people another option in which to pay when they come across a donation box. With less than 16% of transactions actually being done with cash as of 2019 (Source) it means that standard coin pots will likely lose out on donations therefore, A way to pay on your phone or card would increase donations and negate the need for physical pots. QR codes are an incredibly cost effective and wide spread solution to giving access to a website quickly especially with the NHS' use of them with the Covid-19 track and trace app which encourage most of the population to require and download a QR scanner if one was not pre-installed on their phone.

An example

QR Codes are usually square images that encode data using black and white squares, using a QR code scanner app you can decode the content and view it. In the case of Donater, we would be encoding website urls to different charities' instances of Donater. With urls we can easily track the location the scan came from as well using get request parameters and see where the volumes of donations are higher. On the right is an example which links to the Donater for Winchester spare change for lasting change.

Step based navigation

Step based navigation

We wanted Donater to look like a native app as much as possible as the primary devices people would be using the app on would be mobile. To do this, making use of Vue transitions would be the best way. I planned on having each step be its own component within a parent container. The parent container would be a hub of all of the app's data and prevent parts being unnecessarily being split up. The parent would make use of a step variable which would be used to select which component is shown and easily move back and forth through steps as required. Doing it like this also means that the whole process is much faster as the user will not need to wait for page loads, there is just one initial load for the web app.

Initial load

Initial load

When the app is initially loaded, an axios http request is made to the backend's API route which provides all of the data about a client. The url that the app sits on takes two parameters one being a slug for the client ( A slug is a unique word or sentence that is url friendly used as a readable id for a row in a database ), and a location id. The Vue application pulls these two values from the URL and sends them to the api for that slug's corresponding data. The data payload contains everything from the theme colours, to the donation options to the images used.

Donater Header

The first component created was the header. This block would be persistant across all screens on the app and would be home to the charity's profile picture, banner, name and description.

The component takes in a number of props sourced from the initial data load which it inserts into a styles template. It has two states as the header can collapse triggered by a boolean value. When collapsed is true, the collapsed css class is applied to the header which shrinks it down and removes the description. This is useful as it means on pages which require more space for content, the header can be moved out of the way and focus can be put on other elements.


Donation options

Donation options

The first page shown to the user is a list of donation options for the charity. This is customised by the charity in the backend admin and is obtained by the app in the initial load. The buttons each hold a value which is directly shown and passed onto the next stage apart from if 0 is set as a value. In this case, the app will replace the button with a 'custom amount' option which will instead bring up a small modal asking the user to add their own amount. When one of these buttons are clicked, the component emits that value back to the parent container which sets the chosen option in its data function ready for later use.

Emitting options

Stripe integration

Stripe integration

Rather than handling payments through our own payment gateway, we opted to use an intergration of Stripe. This is safer as it prevents any issues of payment data being stolen, lost or anything else and offers compatibility with all major banks. The Vue community has also created a package for Stripe which provides front end components which can generate payment intents to be sent to a custom backend.

Including stripe

To make use of the Vue stripe package, we first need to add stripe as a dependency via their cdn. To achieve this, I called a function when the payment component is mounted which takes the stripe cdn URL, creates a script tag and mounts it onto the DOM.

Mounting the element

Once the Stripe library was imported, I could then create a new 'element' which is a Stripe component for a card number input or CSV etc. I opted to create a full card input which includes validation and detects the card type. I then mounted it onto the div with id #card-element so that it is visible on the page.

Google and Apple pay

Google and Apple pay

One of the main requirements of the app was to incorporate google and apple pay to make the payment process much faster for mobile users.

To achieve this, I needed to mount a second component that uses a seperate payment request to the standard card element. If the element detected a mobile device capable of making one of these payments it would show a button to do so, on the right is an example of an android phone with google pay capability. When the pay now button is tapped, it will bring up the google pay overlay.

Logging data

Once both elements have been mounted, a request is sent to the api which generates a payment intent using the charity's client secret. The google/apple pay now has everything it needs and when clicked can complete the payment intent with a payment method and send the details back to the api. However, some more configuration is needed for standard card payments.

In App Browsers

In App Browsers

When testing the app, we came across an issue with in app browsers. We found that payments would not process correctly inside one of these applications so would need to warn users. To achieve this, I added in a check which takes the user's browser agent and looks at whether it is that of facebook's in app browser or any other tracable examples. If this check returned true, the app will show a notice advising to reopen the app in a fully fledged browser.

Standard Payment

For a standard payment, after the user has added their card details they can tap the 'donate with card' button which calls the function on the right. This is very similar to the apple/google payment however, instead a new payment method is created using the card details which is sent back to the api and completes the payment.

Post Donation

Post Donation

After a donation is complete, the user is then presented with a list of options. These are customisable in the client's backend and are shown based on ids. Each option has its own component which open a modal when tapped. When a form inside a modal is completed and submitted, it is marked as completed by adding the id to a 'completed' array and greyed out so that it cannot be done multiple times.

Browser check

Results

Results

With the updated UI and efficient code, Donater has become very successful for chairities with the light up Winchester bonfire event raising over £20,000 through the app. The app will be continually updated to include more useful features clients may request and will hopefully raise more and more money for charities that need it.