Aura gas App

Aura gas App

ReactLaravel
Aura gas is a boiler servicing and repairs company who needed a native IOS and Android app for their customers. It would need to be able to edit their personal details, show them the latest news about Aura gas, store information about their boiler and interact with google nest devices so a user can control their heating. This was a project created while working with Sprechen.

Learning native development

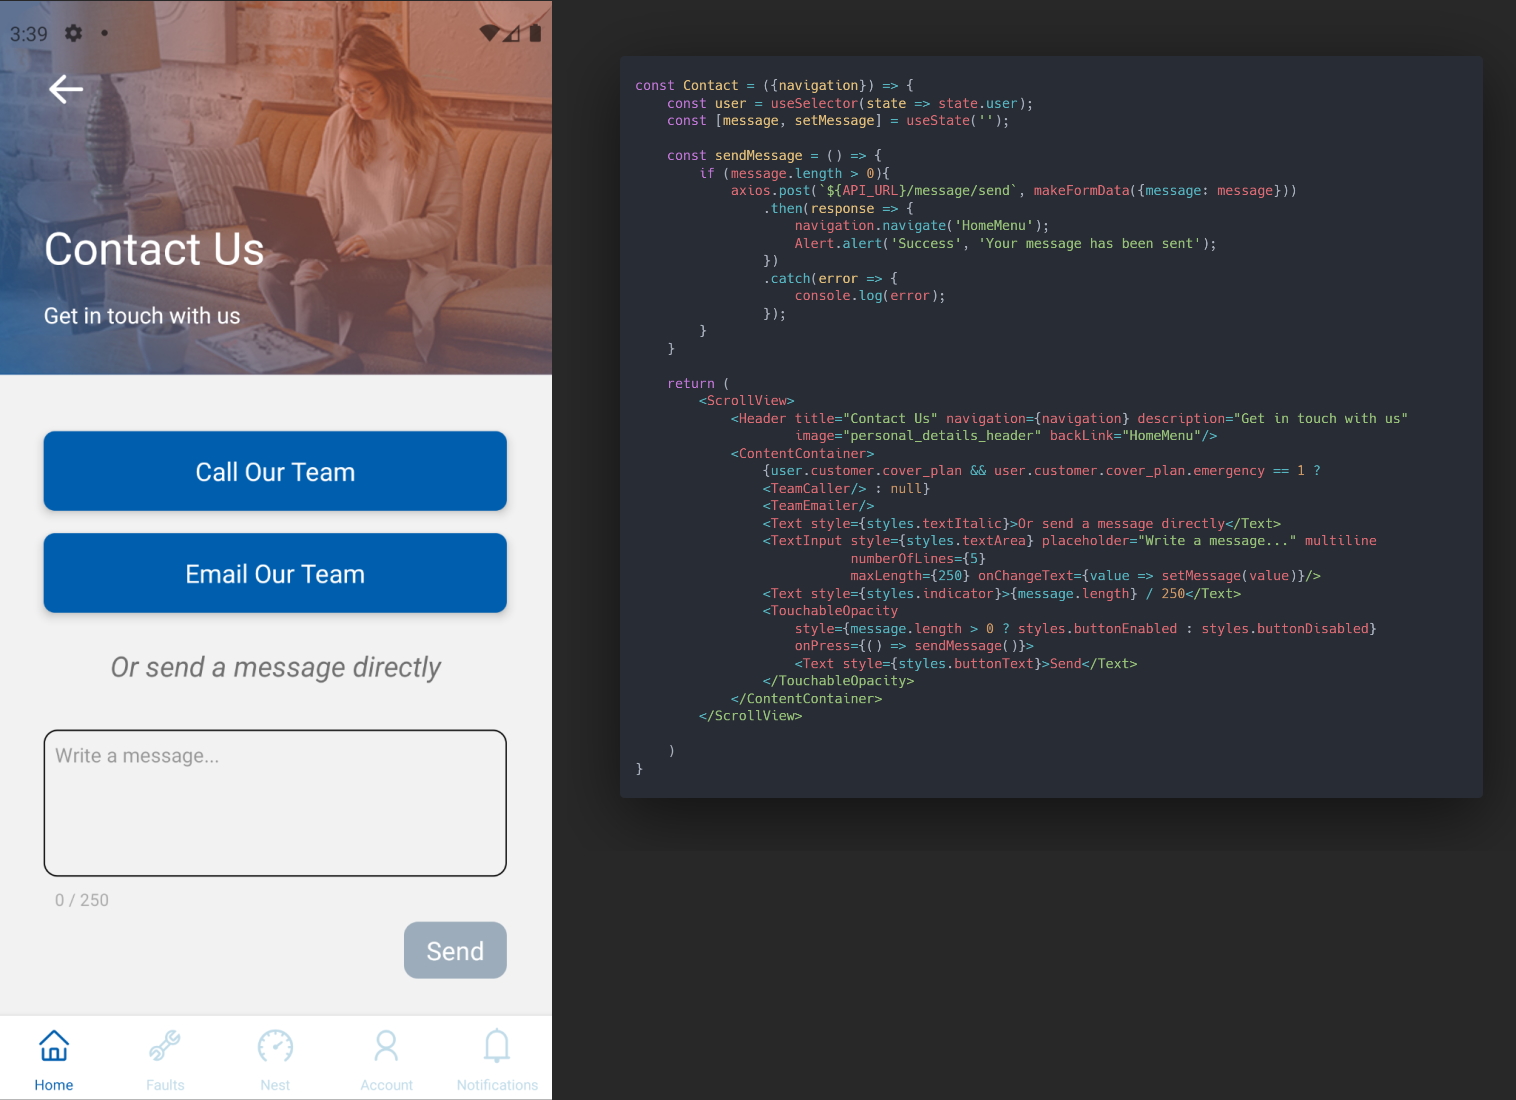
Before this project, I had never tackled native application development as I always believed web apps were more cost effective as they work on all devices. However, there are cases, such as with this project, where use of native phone features such as accelerometers, phone calls, and AI assistants (siri, google assistant etc.) is required. I decided to use react native for this project as I was planning on learning react anyway and this would be a good chance to do so. This would also be much faster and cost effective then learning Xcode and Kotlin to make seperate IOS and android apps as the code base would be the same across all platforms. Being quite well versed in Vue.js I knew that react was very similar in how it functions only differing in syntax and the way things are laid out. In concept the two frameworks are virtually the same.

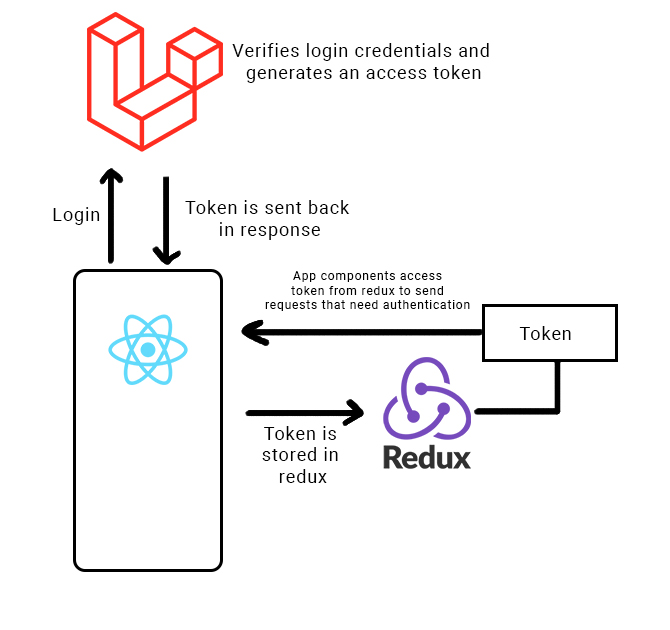
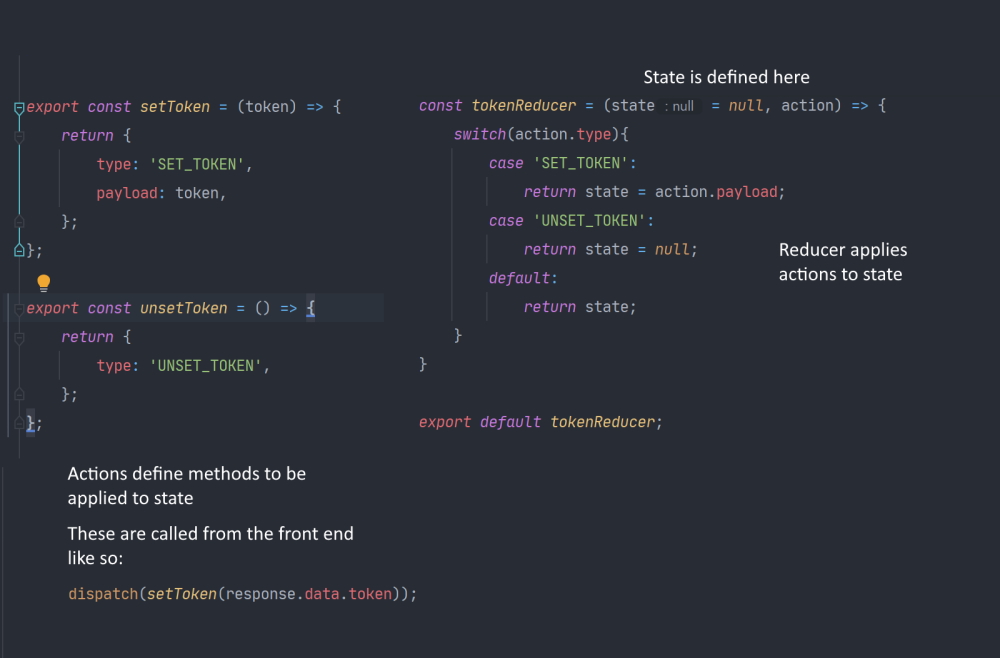
To get my head around the basics of Facebook's framework, I used the React documentation, Traversy media's crash course in react native as well as various articles online about concepts such as redux and the react navigation stack. Once I was done doing research I jumped into creating the app.

Expo and the react native cli

Expo and the react native cli

In terms of running a test environment, I used expo to run a local server hosting the app so that I could also use the app on my phone along with android studio's emulator. I did attempt to install dependencies using the react native cli however, it didn't work very well within windows so I switched to expo. As a note, the react native cli did work perfectly on Linux and assumedly would on Mac OS as well. Expo also includes an NPM interface which works to make sure package versions are compatible and automatically links dependencies within react native.

Setup

App Navigation

App Navigation

Similar to how routers work in web frameworks, React native has navigation elements which allow screens to be switched out and moved between.

These are known as navigators and there are multiple types corresponding to different UI elements (ex. Tabs, Stacks, Side menus etc.) The way I implemented these was to nest them inside each other. So, the main screens of the app are within a tab navigator which can be traversed using the bottom tabs and inside some of the tab screens there are stack navigator to allow for submenus and so on.

Tab Navigator

State and tokens

State and tokens

The application required an authentication system with user accounts. This would allow a customer of Aura gas to log in and check their personal details, boiler cover plan and control Nest devices. In order for this to work on the application, there needs to be two things:

  1. A backend authorisation system with access and refresh tokens.
  2. A front end state management system to keep track of the logged in user's access token allowing them to access resources.

I used Laravel as a backend and implemented Laravel passport as the authentication manager. This creates a table in the backend database which stores unique access tokens which have expiry dates and are passed as a response after a successful login request.

When the token is retrieved by the front end I used redux to store it as a global state for the whole application so that it can be accessed from all components and sent in future api requests.

Whether the token is present or not also dictates whether the user is logged in or out and serves as a way to boot the user out to the login page if they do not have a valid one.


Reducers

Reducers

Redux works based off of reducers, actions and states.

  • A store keeps a record of a variable and cannot be changed directly using normal Javascript declaration.
  • A reducer applies actions to a state, for instance change the value of a state variable.
  • An action is a definition of what can be done to a state. These are called from outside the store and can be used to interact with a reducer.

The combination of these elements means that a token, user or other global data can be stored safely across the application without risk of them being unnecessarily mutated. It also eliminates the need for data to be passed through the component chain and making code confusing and messy.

Persistent login

Persistent login

A large piece of functionality for mobile applications is being able to login once and then not being asked when the app is re-opened. I found that the best way to go about achieving this was to store the existing access token in the phone's storage. When the user logs in and the token is store in redux, it is also stored in phone storage using the Expo secure store library. This way, when the user re-opens the app, the application checks the store for the token and sends it to the back-end for validation. The Laravel backend will then verify the token and send back user details if it is valid for the app to sign in the user. The duration in which a user can stay logged in for can be defined using an expiry on access tokens within the backend.

Welcoming users

Welcoming users

Most apps use a slideshow to welcome users and explain what the app does. To achieve an animated welcome slider I used the react-native-app-intro-slider and created a component for it. This component is shown conditionally depending on whether the variable firstTime is true. This functionality works in the same way as persistent login where a variables stored in the Expo secure store the first time the user opens the app. This way, the next time the user opens it, the app can see that this variable is already present and will not the welcome screen.

Welcome Screen

Component State

Component State

Coming from Vue.js, One thing I found interesting within React is the fact that reactive data is treated as a local state for a component and requires the import of useState from the react library. It works in a very similar way to redux on a local scale where a variable is a state and can only be mutated using its changing function where Vue treats reactive properties as standard Javascript variables that can simply be assigned.

Props in components

Props in components

Similar to Vue.js, React carries over the use of props in components. I utilised these to make my components more reusable such as with the header. This is a UI block with a background image, customisable title and description which is used on most screens. I also defined a prop called backLink which would add a back arrow to the top left and could be used to travel back in the app's navigation history. My preferred way of conditionally showing elements is to use Javascript's ternary operator which takes a boolean on the left hand side and will return the value left or right depending on whether the result is true or false respectively.

Header

Logging activity

Logging activity

Spatie offers an amazing package for logging user activity that takes a model and action description as arguments. Laravel-activitylog sits on the backend for the application and is built into a few of the API end points. To simplify the process, I first created a new service with different functions written to log different activities. For example: Log in, log out, change in account details etc.

Organising these functions into a service means that they can be accessed by any controller the services is imported into and therefore activity can be logged in any endpoint. These are called at points such as when the login API route is hit by the app which can then call a function from the service to log the user's sign in against their account model. Adding a has many model to the user makes the logs even more useful as a single user's activity can be accessed by calling a function.

Logging service
Call logging

An example of where logging is used is with the call team button. I created a component for the button which when pressed would make an HTTP request to an API endpoint that would log a phone call against the logged-in user. After the API returns a response, the app uses the React linking library to open the phone's dialler and insert Aura Gas' support number.

Fault finding

Fault finding

The fault-finder was the most important feature for the application. It would allow a customer to type in their boiler make and be given a list of relevant fault codes and issues, if the user's issue was among these, they could tap and see what the issue means and how it could be fixed. Otherwise, they would be presented with a button to call the support team instead. To achieve this functionality, I was given a csv file containing a list of fault codes for each boiler make along with their description and fix instructions. I reformatted the data to suit an SQL database with a model for boiler makes each of which has many fault codes which could then be displayed appropriately by the app through API requests.

The fault-finder also needed a review system so that Aura gas would be able to gauge how much use their customers are getting out of it. I did this by creating a simple component with thumbs up and thumbs down buttons which would respectively create a review for that fault code by sending an API request. I also made use of the react-native-animatable package to make the reviewer disappear when a button is tapped.

Form submission

Form submission

There are various forms in the application to update personal details, boiler information, and send referrals to friends. These were handled mostly in the same way where a state was utilized as an object to track form data. Each input corresponded to a formData object attribute and was updated when the input is changed. To keep UI consistent across these screens, I also created a new component called tap input that would take an icon and label to create the elements shown in this screenshot. Once the submit button it tapped, the data is sent via Axios to the backend API and handled appropriately. Validation is also done on the backend and errors are sent back if the data is not in a valid format.

The Information bank

The Information bank

The app keeps a bank of information about boiler and heating topic. These articles are created in the admin panel and categorised using an Information category model. These categories are used in a select dropdown in order to filter down results so users can find what they're looking for. The select drop down shown changes based on the platform being used, the example shown here is android's variant of the UI, where apple devices would instead use a wheel interaction fixed to the bottom of the screen.

Test Flight

Test Flight

With most of the app functionality complete, I would go on to create both an android APK and IOS IPA file using Expos build workflow. I would be able to immediately test out the android version of the app as APK files can be directly installed however, for IOS, Test flight would need to be utilized in order to try the built app on iPhones. The app was first internally tested at Sprechen to find any glaring issues with UI and functionality. Most of the issues found were to do with UI on IOS devices as during development I did not have access to one, once these were identified they could be fixed by altering some styling. Another issue came up with the fault finder crashing the app after searching which was found to have been caused by a simple variable name typo.

Further tests

The client was also given access to the test build and flagged up that they wanted articles in the information bank to support rich text. This would require two changes:

  1. Adding rich text editing to the backend information editor
  2. Adding an HTML rendering component to the front end articles.

To achieve these, I altered the backpack configuration for information articles to use a WYSIWYG editor rather than a standard text area and then for the front end installed react-native-render-html package which would be able to take the inputted data and translate it to native styling. These changes would give access to images, links, bullet points, font sizing and colouring to make articles more interesting for readers.

The Back-end

The Back-end

So that more time could be spent focusing on the application, the backend was built using Laravel backpack. Backpack speeds up development by creating an admin panel based off of database models that the developer creates. This way time does not need to be sent coding simple CRUD controllers and styling admin panels over and over again. Because Backpack only applies to the CRUD side of the application, normal controllers and an API can be created as normal. In this app's case, most of the data manipulation such as user details comes from the app interacting with the API. This data can then be seen by admin users by accessing this admin panel. It is also a place where they are able to add boiler makes, fault codes, information articles and news articles for the app to use.

Push Notifications

Push Notifications

Notifications are a key feature for any application. Creating them takes 3 things on both the front and back end. Firstly, I created a CRUD model called notification that would hold a title, description and article id. Next, I used the expo-notifications package in the application that registers a device running the app for notifications. Upon the user agreeing to be sent notifications, the device's unique ID is sent to the backend which is then registered using the laravel-exponent-push-notifications package. Now that the device is registered, when a new notification is created, a function is executed for all of the registered devices which sends out the notification for the device to receive. As long as the app is installed on a device, it will listen for these notifications and display them even when the app is closed.

Notification sender
Notification alert

To give the notifications further functionality, I gave them an article ID field. This field is used when the notification is clicked and the listener picks it up. If the field is not null, the app pushes the navigation stack to the articles page and fetches the associated article. This way news can easily be sent out to customers with a notification.

Second Review

After playing with the new version of the app, the client came back with a few additional features that they believed would be useful in the app, these where:

  1. A direct contact form for users.
  2. A screen for all previous notifications.
  3. Adding Google nest integration.
  4. Adding boiler make, model and serial number to the details page.
  5. Changing contact options based on whether a user's plan covered emergencies.
  6. Sharing articles to social media.

Below I will explain how each of these new features were implemented in the third build.

Contact form

Contact form

For the contact form, I included both the team caller and emailer components from the faults menu as well as a multiline text input for the user to write a message. I also included a small indicator underneath the input which shows how many characters out of the 250 limit you have used. This simply looks at the length of the message. When send Is tapped, the message is bundled as form data and sent via axios to the backend where it is saved for review by admins.

Notifications page

Notifications page

Displaying a page of all of the notifications was made a lot easier due to the way in which I created them. When a notification is sent to users, it is stored in a data table so building this page just required a new API route that would return all of these saved notifications. When looking for inspiration for this kind of page, I found that they all used a similar method of showing when the notification as sent. Rather than saying a date, they would show how many days, hours etc. had passed since it had been sent. To achieve this, I took the created_at time stamp from the row and converted it to total seconds. I would then take the time now in seconds and find the difference. If it was less than 60, I would return "x seconds ago" if it were less than 3600 it would return "x minutes ago" and continued up to years.

Elapsed time

Sharing articles to social media

Sharing articles to social media

Sharing articles to social media seemed a strange idea to me at first because to see articles, a user needs to be logged in. However, I didn't know that their website had a blog planned and that they would share articles to both the site and app. Therefore, to accommodate this feature, I added a URL field to articles that would be used to share within the app. When the share button is tapped, the URL field would be used to copy and share to feeds on social media.


To implement the native share UI I originally tried using the react-native-share package as I wasn't sure as to how to create it. When trying to run this package, I ran into crashes and issues which could not be resolved. I think this was because of version mismatches. However, after removing the package, I found that React native itself already had share integration that I could use. Documentation for this can be found here.

Future Updates

The next stage in the app's development will involve adding in the planned Google nest integration using their API. This will be done during the next semester to fully complete the application with heating controls and Google authentication.